
So, Take better photos – now!
People often ask me how they could ‘take better photos’, without really knowing what that might mean. A bit like me wishing I could make an omelette, really. How do I even know what a really good omelette is? I kinda know what I want the taste and texture to be in general, but can I put it into words? Hmmm …
I thought I would write a ‘one-stop’ beginner article, which would contain all the basics to get started. As you read, you could then dig into my other articles if you wanted to.
So it’s an easy and short read. Let’s go! These are my Top Tips, in order of importance:-
Use of Camera Tips
- Should you use a Camera or phone? It doesn’t matter, the picture taking device you have with you right here right now in your sweaty palm is the best one. So, if you take a few images a week – stick to your phone. If you take dozens a day – maybe get a camera. And any old phone will do! The technology is getting better and better for quite large prints.
- Walk around. – Use your feet more than your camera. Don’t stand still – more on that here. For landscapes, you need to examine all the available angles. For people, you just need to get in close. I reckon over three quarters of the ‘family snaps’ that I see, the photographer has not used their feet and thus got in a bit closer. Not too close (selfie-style!) so that people’s noses get enlarged, mind you!
Look, See, Observe.
Because for landscapes it’s all about looking at the angles that you have available, and using all the elements you can find. The best coloured rocks, the most beautifully shaped trees, the most interesting area of the stream, the perfect surf breaking, other points of interest. And this leads me to my next point… - Slow down. I’ll give you an example. You are on a road trip and have just pulled (safely) to the side of the road into a parking bay overlooking a stunning vista. A mini-bus stops next to you. How many times have you seen the entire bus empty in a nano-second, and pictures being fired off faster than Clint Eastwood in a duel when the Ennio Morricone music is building to a crescendo in the background? If only everyone would actually ‘look’ at the scene rather than just seeing it. Look, See, Observe. Breathe in, breathe out, relax, 🙂 …. Pay attention! More here.
There is actually a disadvantage here to using a phone. It’s more difficult to grasp firmly in your hand, and study the view, than it is when you have a camera pressed to your eye, in my opinion. I also find phone images are difficult to see in bright light. Of course if you are willing to start using a tripod you will notice an improvement instantly. The reason you need to slow down is so you can follow these basic composition tips…
Composition Tips
- Give your Image Depth.. sounds complicated but it isn’t. Have you ever read a book that didn’t end well, not very well wrapped up by the author? Or maybe the author didn’t sketch out the characters well enough at the start? How much did you enjoy that book? Because you want a book to have a Beginning, Middle, End. Or Front bit / Middle bit / Back bit. Just like your photo. Find a nice shaped rock, grass clump or similar to use as foreground, then place your Subject Matter in the middle distance, and then you have the distant background – ocean horizon, mountains, sunset colours, to balance it all out. Read more here.
- Use the Rule of Thirds. Are you still with me? Ok – last one for now. Simply put – don’t bang your subject slap in the middle of the frame. It won’t like being Slapped! That actually works for both the horizontal and vertical middle. Sooo… imagine your camera or phone has a 3×3 grid on it. Like a noughts and crosses, or a Tic-Tac-Toe grid. What you do is place the main bits of your photo – horizon line etc – on one of those lines, which are called ‘thirds’ (funny that). THEN you place the main bit of the photo on one of the intersections of two lines. That would be your subject’s face or maybe that waterfall you found. I know this one isn’t so easy, so More on that here.
That was easy, wasn’t it? Is your five minutes up?
Andrew Barnes
The Landscape Photographer
PS – some examples…

BULLET 1 – This was a phone grab – yours truly as happy as I could be, in a hired Mustang driving up the volcano on Maui. I wouldn’t have got the tripod out to do it. I love this shot… such good memories (and now so long ago!)

Bullet 2 AND Bullet 3 – do you think these people walked around, and tried to find the best angle? They all certainly found the most obvious one, that required the least walking from the car park. Still, I suppose penguins huddle together in the cold, as well… 🙂 Once again up a volcano on Maui. I was actually standing a looong way from the huddle here, with my tripod, to get my shot.

Bullet 4 – Back in Berowra, this image has DEPTH!!!! – the ‘steps’ go BANG at you and make you realise just how many layers you are looking at. Add in the Sunset and clouds at The Back, and the highlights on the bush in the Middle. What a visual sandwich!
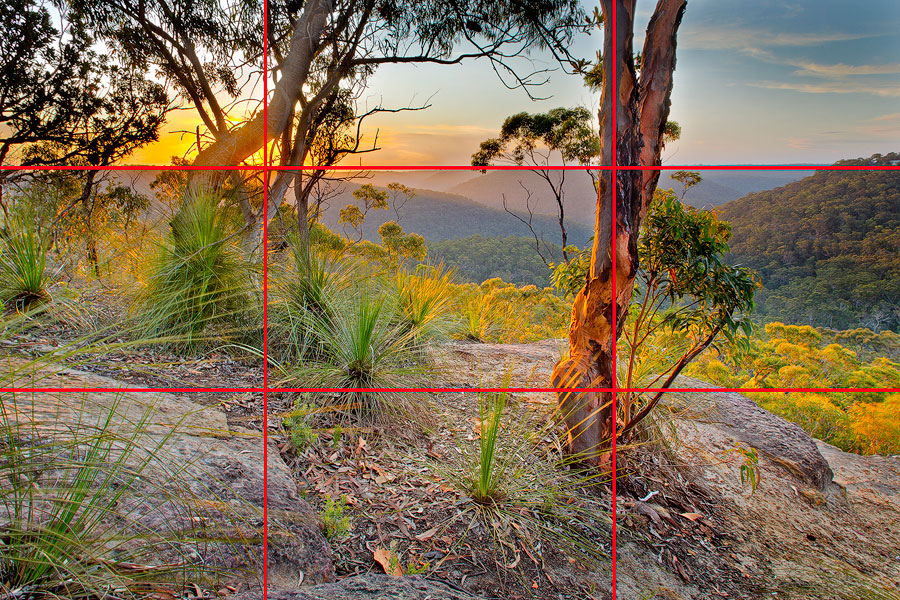
Bullet 5 – The obligatory grid to show you the Rule of Thirds… horizon on a line, tree on a line, sunset on an intersection..

BULLET 5 – Rule of Thirds, with my kids a while(!) back… once again off to the side near a ‘third’ line, NOT in the middle. This leaves a nice bit of room for Three Sisters to join Two Brothers.. groan, did I really just type that?


